Floor screeding and epoxy resin flooring both create strong, lasting surfaces for homes, offices, and factories. They differ in purpose, process, and performance, helping owners pick the right fit for busy West Midlands sites.
Introduction to Epoxy Resin Flooring
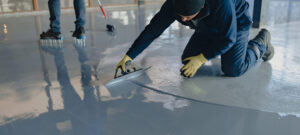
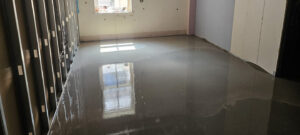
Epoxy resin flooring starts with a two-part mix: resin and hardener. When blended, it forms a chemical bond that hardens into a tough, glossy layer over concrete. This coating seals the base completely, blocking water, chemicals, and dirt. In industrial spots or garages, it provides a smooth, colorful finish ready for foot traffic or vehicles right after curing. Teams apply it in thin layers, often 1 to 6 mm thick, making it ideal for upgrades without heavy rebuilding. Its seamless design means no grout lines or cracks for grime to hide, boosting hygiene in kitchens or workshops.
Introduction to Floor Screeding
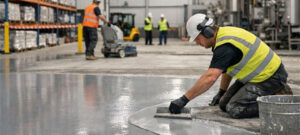
Floor screeding involves pouring a cement-based mix over a rough concrete subfloor to level it out. This layer acts as a smooth foundation for final coverings like tiles, carpet, or vinyl. It corrects uneven spots, fills dips, and preps for underfloor heating systems. Screed comes thicker, typically 10 to 50 mm, to handle structural needs and ensure a flat walking plane. In new builds or renovations, it dries slowly over weeks, creating a stable base that lasts decades under daily use.
How Floor Screeding Works
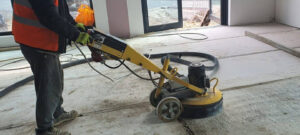
Preparing the Subfloor
Workers start by cleaning the concrete slab thoroughly. They remove dust, grease, and loose bits with grinders or vacuums. Cracks get filled, and the surface primes for better grip. This step prevents weak bonds that lead to future cracks.
Mixing and Applying the Screed
A basic mix blends sharp sand, cement, water, and sometimes plasticizers for flow. For faster jobs, anhydrite or polymer screeds pump in liquid form. Pros spread it with screed rails or lasers for perfect evenness. They trowel the top smooth while wet.
Curing and Finishing
Screed needs time to set, 1 to 28 days depending on type and thickness. Cover it with plastic to slow drying and avoid shrinks. Once hard, sand or polish lightly for top coats. [How Floor Screeding Works] ensures dips under 3 mm vanish, making floors safe and true.
Core Differences Between the Two
Epoxy serves as a final wear layer with shine and seal. Screeding builds the base layer for strength and level. Epoxy bonds chemically for flexibility; screed hardens rigidly for load support. Where epoxy shines against spills, screed excels at insulation and height fixes.
Strength and Longevity Breakdown
Epoxy resists abrasion, impacts, and hot tires up to 10-20 years in light use. Its elasticity absorbs minor shifts without breaking. Heavy point loads, like fork tines, can dent thin spots over time.
Screed carries massive weights, think warehouse racks, without sag. Cement gains strength yearly, outlasting epoxy under tiles. Poor curing leads to curls or dust, needing repairs sooner.
In chemical plants, epoxy protects best; for structural pads, screed rules.
Speed of Installation
Epoxy wins for fast turnarounds. Prime the base, roll or trowel on, and walk on it next day. Full cure takes 3-7 days. Screed pours quick but demands 4-8 weeks dry time before covers, slowing refurbs.
For shops closing weekends, epoxy reopens quick. New homes plan screed early.
Cost Analysis Over Time
Epoxy runs £30-£60 per square meter installed. High upfront pays off in zero grout cleans and rare swaps.
Screed costs £15-£30 per square meter, cheaper start. Add tiles or polish later, hiking total. Long-run, screed saves if paired right; epoxy cuts labor yearly.
Maintenance Compared
Epoxy wipes clean with soap, spills bead up. Refresh topcoat every 5-10 years. UV fades colors outdoors.
Screed sweeps easy bare but stains open pores. Seal it or top with finishes. Check for cracks from settling.
Food zones favor epoxy’s germ block; homes like screed’s breath for heat.
Ideal Applications
Epoxy in Tough Environments
Garages, factories, and hospitals pick epoxy for seamless chem shield. Colors match brands, and anti-slip adds safety.
Screed in Construction Bases
Homes, schools, and offices use screed under finals. It pipes heat evenly and quiets steps. Thick lifts fix old uneven slabs.
Side-by-Side Comparison Table
| Aspect | Epoxy Resin Flooring | Floor Screeding |
| Main Role | Protective finish coat | Leveling base layer |
| Thickness | 1-6 mm | 10-50 mm |
| Dry Time | 1-7 days | 7-28+ days |
| Chem Resist | Excellent | Fair (unsealed) |
| Cost/sq m | £30-60 | £15-30 |
| Flexibility | Moderate | Low (rigid) |
| Best Use | Garages, kitchens, warehouses | Homes, under tiles/heating |
This chart shows epoxy for ready-use shine; screed for build prep.
Safety and Health Angles
Epoxy’s pores-free seal stops bacteria, passes food safety tests. Add aggregates for grip in wet areas.
Screed provides stable footing with no trip seams. Dust from grinding needs masks; cured, it’s inert.
Both outperform carpet for allergy control.
Sustainability Factors
Epoxy tops existing floors, cutting landfill waste. Resins derive from petro, but low VOC types green up.
Screed uses local aggregates, low transport emissions. Recyclable fully. Anhydrite types save water.
Pair them: screed base, epoxy cap for max life.
Common Challenges and Fixes
Epoxy bubbles from moisture, test slabs first. Screed cracks from fast dry, mist cure it.
Hire pros for mixes; amateurs botch bonds.
Future Trends
Self-healing epoxies repair scratches. Flow screeds pump floors in hours. Hybrids merge resin into screed for ultra-tough bases.
Midlands industry shifts to these for zero downtime.
Conclusion
Epoxy resin flooring delivers quick, sealed beauty for harsh use; floor screeding lays reliable levels for any topper. Weigh your space’s needs, speed and shine versus structure and savings, for the win.